http://blog.shinono.me
参考「Linux HA Japan」:http://linux-ha.sourceforge.jp/wp/
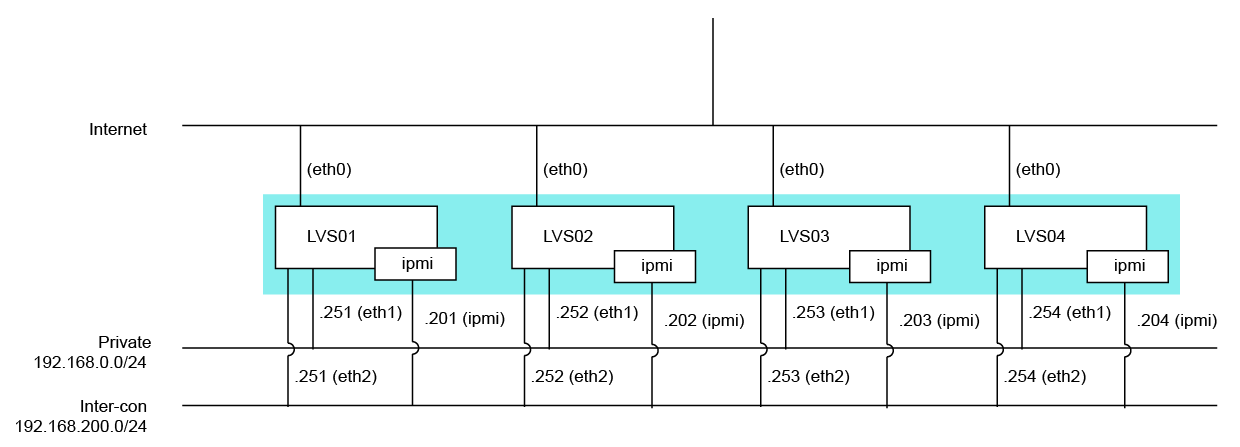
構成図

powered by nwdiag + Adobe Illustrator
Pacemakerを使うのに、クラスタマネージャをHeartbeatかCorosyncか迷ったので、
まずはこんなものをTwitterへ投げてみたり。
http://twitter.com/H_Shinonome/status/105463900308373504
すると、Linux-HA界隈の方から次々と。
http://twitter.com/minky0/status/105465388506165248
http://twitter.com/minky0/status/105465811560439809
http://twitter.com/tsukishima_ha/status/105469359866118147
http://twitter.com/tsukishima_ha/status/105472064282038272
ありがたやありがたや。
ということで、Pacemaker + Heartbeatでクラスタリングをしてみたのです。
インストール手順は参考URLにあるので割愛。
まずはHeartbeatの設定から。
/etc/ha.d/ha.cf
ポイントは、一行目の [ pacemaker on ]
Heartbeat v2を使って、リソースマネージャにCRMを使ってる人は [ crm yes ] を残してしまうかもしれませんが、Heartbeat起動時にエラーになるので注意です。
その他の注意事項としては heartbeat の chkconfig は off にしておきましょう。
今回台数が4台ということもあるので、マルチキャストで相互監視をしています。
構成図
powered by nwdiag + Adobe Illustrator
Pacemakerを使うのに、クラスタマネージャをHeartbeatかCorosyncか迷ったので、
まずはこんなものをTwitterへ投げてみたり。
http://twitter.com/H_Shinonome/status/105463900308373504
すると、Linux-HA界隈の方から次々と。
http://twitter.com/minky0/status/105465388506165248
http://twitter.com/minky0/status/105465811560439809
http://twitter.com/tsukishima_ha/status/105469359866118147
http://twitter.com/tsukishima_ha/status/105472064282038272
ありがたやありがたや。
ということで、Pacemaker + Heartbeatでクラスタリングをしてみたのです。
インストール手順は参考URLにあるので割愛。
まずはHeartbeatの設定から。
/etc/ha.d/ha.cf
pacemaker on

logfile /var/log/ha.log
logfacility local1
keepalive 3
deadtime 15
deadping 20
warntime 5
initdead 60
udpport 694
auto_failback off

mcast eth2 225.0.0.1 694 1 0
node LVS01
node LVS02
node LVS03
node LVS04
respawn root /usr/lib64/heartbeat/pingd -m 100 -d 5s -a default_ping_set
ポイントは、一行目の [ pacemaker on ]
Heartbeat v2を使って、リソースマネージャにCRMを使ってる人は [ crm yes ] を残してしまうかもしれませんが、Heartbeat起動時にエラーになるので注意です。
その他の注意事項としては heartbeat の chkconfig は off にしておきましょう。
今回台数が4台ということもあるので、マルチキャストで相互監視をしています。
+ + + + + + + + + +
そして、Pacemakerの設定です。
# crm configure show (一部改変)
= ノード情報 =
STONITHにはIPMIを利用しています。Inter-connectのLANと同一セグメントです。
続いて、IPアドレス制御。
STONITHでのIPMI操作に対して、自分自身を監視することのないようにLocation設定を行います。
「 # 」ではコメントにならないので、uname以降も設定です。
最後にSTONITHを利用することと、自動フェイルバックしないようにする設定
これで、各サーバーを起動してやれば、HB3+Pacemakerクラスタの出来上がり。正直、CRMのXMLをいじる必要が無いので、相当簡単に思いました。
# crm configure show (一部改変)
= ノード情報 =
node $id="XXXXXXXX-XXXX-XXXX-XXXX-XXXXXXXXXXXX" LVS01 \
	attributes standby="off"
node $id="XXXXXXXX-XXXX-XXXX-XXXX-XXXXXXXXXXXX" LVS02 \
	attributes standby="off"
node $id="XXXXXXXX-XXXX-XXXX-XXXX-XXXXXXXXXXXX" LVS03 \
	attributes standby="off"
node $id="XXXXXXXX-XXXX-XXXX-XXXX-XXXXXXXXXXXX" LVS04 \
	attributes standby="off"
STONITHにはIPMIを利用しています。Inter-connectのLANと同一セグメントです。
primitive LVS01 stonith:external/ipmi \
	params userid="user" \
		passwd="password" \
		ipaddr="192.168.200.201" \
		hostname="LVS01" \
		interface="lanplus" \
	op start interval="0s" timeout="60s" on-fail="restart" \
	op monitor interval="300s" timeout="60s" on-fail="restart" \
	op stop interval="0s" timeout="60s" on-fail="ignore"
primitive LVS02 stonith:external/ipmi \
	params userid="user" \
		passwd="password" \
		ipaddr="192.168.200.202" \
		hostname="LVS01" \
		interface="lanplus" \
	op start interval="0s" timeout="60s" on-fail="restart" \
	op monitor interval="300s" timeout="60s" on-fail="restart" \
	op stop interval="0s" timeout="60s" on-fail="ignore"
primitive LVS03 stonith:external/ipmi \
	params userid="user" \
		passwd="password" \
		ipaddr="192.168.200.203 \
		hostname="LVS01" \
		interface="lanplus" \
	op start interval="0s" timeout="60s" on-fail="restart" \
	op monitor interval="300s" timeout="60s" on-fail="restart" \
	op stop interval="0s" timeout="60s" on-fail="ignore"
primitive LVS04 stonith:external/ipmi \
	params userid="user" \
		passwd="password" \
		ipaddr="192.168.200.241" \
		hostname="LVS01" \
		interface="lanplus" \
	op start interval="0s" timeout="60s" on-fail="restart" \
	op monitor interval="300s" timeout="60s" on-fail="restart" \
	op stop interval="0s" timeout="60s" on-fail="ignore"
続いて、IPアドレス制御。
primitive service1_global_1 ocf:heartbeat:IPaddr \
	params ip="xxx.xxx.xxx.1" nic="eth0" cidr_netmask="24" \
	op start interval="0s" timeout="90s" on-fail="restart" \
	op monitor interval="10s" timeout="60s" on-fail="restart" \
	op stop interval="0s" timeout="100s" on-fail="block"
primitive service1_internal_1 ocf:heartbeat:IPaddr \
	params ip="192.168.0.1" nic="eth1" cidr_netmask="24" \
	op start interval="0s" timeout="90s" on-fail="restart" \
	op monitor interval="10s" timeout="60s" on-fail="restart" \
	op stop interval="0s" timeout="100s" on-fail="block"

primitive service2_global_1 ocf:heartbeat:IPaddr \
	params ip="xxx.xxx.xxx.2" nic="eth0" cidr_netmask="24" \
	op start interval="0s" timeout="90s" on-fail="restart" \
	op monitor interval="10s" timeout="60s" on-fail="restart" \
	op stop interval="0s" timeout="100s" on-fail="block"
primitive service2_internal_1 ocf:heartbeat:IPaddr \
	params ip="192.168.0.2" nic="eth1" cidr_netmask="24" \
	op start interval="0s" timeout="90s" on-fail="restart" \
	op monitor interval="10s" timeout="60s" on-fail="restart" \
	op stop interval="0s" timeout="100s" on-fail="block"

primitive service3_global_1 ocf:heartbeat:IPaddr \
	params ip="xxx.xxx.xxx.3" nic="eth0" cidr_netmask="24" \
	op start interval="0s" timeout="90s" on-fail="restart" \
	op monitor interval="10s" timeout="60s" on-fail="restart" \
	op stop interval="0s" timeout="100s" on-fail="block"
primitive service3_internal_1 ocf:heartbeat:IPaddr \
	params ip="192.168.0.3" nic="eth1" cidr_netmask="24" \
	op start interval="0s" timeout="90s" on-fail="restart" \
	op monitor interval="10s" timeout="60s" on-fail="restart" \
	op stop interval="0s" timeout="100s" on-fail="block"

primitive service4_global_1 ocf:heartbeat:IPaddr \
	params ip="xxx.xxx.xxx.4" nic="eth0" cidr_netmask="24" \
	op start interval="0s" timeout="90s" on-fail="restart" \
	op monitor interval="10s" timeout="60s" on-fail="restart" \
	op stop interval="0s" timeout="100s" on-fail="block"
primitive service4_internal_1 ocf:heartbeat:IPaddr \
	params ip="192.168.0.4" nic="eth1" cidr_netmask="24" \
	op start interval="0s" timeout="90s" on-fail="restart" \
	op monitor interval="10s" timeout="60s" on-fail="restart" \
	op stop interval="0s" timeout="100s" on-fail="block"

group service1 service1_global_1 service1_internal_1
group service2 service2_global_1 service2_internal_1
group service3 service3_global_1 service3_internal_1
group service4 service4_global_1 service4_internal_1
STONITHでのIPMI操作に対して、自分自身を監視することのないようにLocation設定を行います。
「 # 」ではコメントにならないので、uname以降も設定です。
location location-LVS01 LVS01 \
	rule $id="location-LVS01-rule" 300: #uname eq LVS02 \
	rule $id="location-LVS01-rule-0" 200: #uname eq LVS03 \
	rule $id="location-LVS01-rule-1" 100: #uname eq LVS04 \
	rule $id="location-LVS01-rule-2" -inf: #uname eq LVS01
location location-LVS02 LVS02 \
	rule $id="location-LVS02-rule" 300: #uname eq LVS03 \
	rule $id="location-LVS02-rule-0" 200: #uname eq LVS04 \
	rule $id="location-LVS02-rule-1" 100: #uname eq LVS01 \
	rule $id="location-LVS02-rule-2" -inf: #uname eq LVS02
location location-LVS03 LVS03 \
	rule $id="location-LVS03-rule" 300: #uname eq LVS04 \
	rule $id="location-LVS03-rule-0" 200: #uname eq LVS01 \
	rule $id="location-LVS03-rule-1" 100: #uname eq LVS02 \
	rule $id="location-LVS03-rule-2" -inf: #uname eq LVS03
location location-LVS04 LVS04 \
	rule $id="location-LVS03-rule" 300: #uname eq LVS01 \
	rule $id="location-LVS03-rule-0" 200: #uname eq LVS02 \
	rule $id="location-LVS03-rule-1" 100: #uname eq LVS03 \
	rule $id="location-LVS03-rule-2" -inf: #uname eq LVS04
最後にSTONITHを利用することと、自動フェイルバックしないようにする設定
property $id="cib-bootstrap-options" \
	cluster-infrastructure="Heartbeat" \
	no-quorum-policy="ignore" \
	stonith-enabled="true" \
	startup-fencing="false"
rsc_defaults $id="rsc-options" \
	resource-stickiness="INFINITY" \
	migration-threshold="1"
これで、各サーバーを起動してやれば、HB3+Pacemakerクラスタの出来上がり。正直、CRMのXMLをいじる必要が無いので、相当簡単に思いました。
この記事にコメントする

